Новые возможности visual studio 2019what’s new in visual studio 2019
Содержание:
- Начало работыGet started
- Install the Visual Studio IDE
- Выбор типа шаблонаSelect a template type
- Использование свойств проекта в директивах сборки и включенияUse project properties in assembly and include directives
- SSMS System Requirements
- Как получить доступ к папке
- Использование режима «Скачать все и установить»Use the «Download all, then install» feature
- Создание проектаCreate a project
- Get support
- Использование 64-разрядной ОСUse a 64-bit OS
- Шаг 4. Выбор рабочих нагрузокStep 4 — Choose workloads
- Из-за чего могут пропасть SMS
- Создание кроссплатформенных приложений и игрBuild cross-platform apps and games
- УдалениеUninstall
- РешенияSolutions
- Предыдущие версииPrevious versions
- 5) Установите GetFLV Player
- .NET.NET
- Примеры:Examples:
- В.C. Совместное использование DISTINCT и SELECTUsing DISTINCT with SELECT
- Г.D. Использование GROUP BYUsing GROUP BY
- Д.E. Использование GROUP BY с несколькими группамиUsing GROUP BY with multiple groups
- Е.F. Использование GROUP BY и WHEREUsing GROUP BY and WHERE
- Ж.G. Использование GROUP BY с выражениемUsing GROUP BY with an expression
- З.H. Использование GROUP BY с ORDER BYUsing GROUP BY with ORDER BY
- И.I. Использование предложения HAVINGUsing the HAVING clause
- Visual Studio 2019 version 16.8.2
Начало работыGet started
Вы можете значительно ускорить процесс работы с меню, выполнив быстрый поиск необходимых элементов, включая команды, настройки, документацию и параметры установки.Save time digging through menus by quickly searching for anything you need, including commands, settings, documentation, and install options. В результатах поиска в Visual Studio будут отображаться сочетания клавиш для команд, которые вы сможете запомнить и использовать в дальнейшей работе.See keyboard shortcuts for commands within your search results in Visual Studio so you can memorize them more easily.
-
Макетирование кода с использованием списка задач.Mock code using task list. Если вам не хватает требований для завершения фрагмента кода, воспользуйтесь окном «Список задач», которое позволяет отслеживать комментарии к коду, где используются маркеры, такие как и , или настраиваемые маркеры, а также управлять сочетаниями клавиш, с помощью которых можно перейти непосредственно к предварительно заданному месту в коде.If you don’t have enough requirements to complete a piece of code, use Task List to track code comments that use tokens such as and , or custom tokens, and to manage shortcuts that take you directly to a predefined location in code. Дополнительные сведения см. в статье Использование списка задач.For more information, see Use the Task List.
-
Использование сочетаний клавиш обозревателя решений.Use Solution Explorer shortcuts. Если вы только начинаете знакомство с Visual Studio, изучите полезные сочетания клавиш, которые позволят ускорить работу с новой базой кода.If you’re new to Visual Studio, these shortcuts will come in handy and save you time while you’re coming up to speed on a new codebase. Полный список сочетаний клавиш см. в статье .For the full list of shortcuts, see .
-
Определение и настройка сочетаний клавиш в Visual Studio .Identify and customize keyboard shortcuts in Visual Studio. Вы можете определить сочетания клавиш для команд Visual Studio, настроить эти сочетания клавиш и экспортировать их для других пользователей.You can identify keyboard shortcuts for Visual Studio commands, customize those shortcuts, and export them for others to use. Сочетания клавиш можно всегда найти и изменить в диалоговом окне «Параметры».You can always find and change a keyboard shortcut in the Options dialog box.
-
Использование специальных возможностей Visual Studio.Make Visual Studio more accessible. Visual Studio имеет встроенные специальные возможности, совместимые со средствами чтения с экрана и другими специальными возможностями.Visual Studio has built-in accessibility features that are compatible with screen readers and other assistive technologies. Полный список доступных возможностей см. в статье Советы и рекомендации по специальным возможностям для Visual Studio.See Accessibility tips and tricks for Visual Studio for the full list of available features.
-
Знакомство с жизненным циклом и обслуживанием продуктов Visual Studio.Check out the Visual Studio Product Lifecycle and Servicing. Дополнительные сведения о получении обновлений для Visual Studio, вариантах поддержки для пользователей версий Enterprise и Professional, поддержке прежних версий Visual Studio, а также компонентах, не включенных в программу обслуживания Visual Studio, см. в статье Жизненный цикл и обслуживание продуктов Visual Studio.For information on how to get updates for Visual Studio, support options for Enterprise and Professional customers, support for older versions of Visual Studio, and components not covered by Visual Studio servicing, see Visual Studio Product Lifecycle and Servicing.
-
Установка пакетов NuGet и управление ими в Visual Studio.Install and manage NuGet packages in Visual Studio. С помощью пользовательского интерфейса диспетчера пакетов NuGet в Visual Studio вы можете легко устанавливать, удалять и обновлять пакеты NuGet в проектах и решениях в ОС Windows.The NuGet Package Manager UI in Visual Studio on Windows allows you to easily install, uninstall, and update NuGet packages in projects and solutions. Дополнительные сведения см. в статье Установка пакетов в Visual Studio и управление ими с помощью диспетчера пакетов NuGet.For more information, see Install and manage packages in Visual Studio using the NuGet Package Manager.
Install the Visual Studio IDE
In this section, you’ll create a simple project to try out some of the things you can do with Visual Studio. You’ll use IntelliSense as a coding aid, debug an app to see the value of a variable during the program’s execution, and change the color theme.
To get started, download Visual Studio and install it on your system. The modular installer enables you to choose and install workloads, which are groups of features needed for the programming language or platform you prefer. To follow the steps for , be sure to select the .NET Core cross-platform development workload during installation.
To get started, download Visual Studio and install it on your system. The modular installer enables you to choose and install workloads, which are groups of features needed for the programming language or platform you prefer. To follow the steps for , be sure to select the .NET Core cross-platform development workload during installation.
When you open Visual Studio for the first time, you can optionally sign in using your Microsoft account or your work or school account.
Выбор типа шаблонаSelect a template type
В левой части страницы Создание проекта отображается список недавно выбранных шаблонов.On the Create a new project page, a list of your recently selected templates appears on the left. Они отсортированы по времени использования.The templates are sorted by most recently used.
Если вы не выбираете один из недавно использованных шаблонов, то можете отфильтровать все доступные шаблоны проектов по параметрам Язык (например, C# или C++), Платформа (например, Windows или Azure) и Тип проекта (например, «Классический» или «Интернет»).If you’re not selecting from the recently used templates, you can filter all available project templates by Language (for example, C# or C++), Platform (for example, Windows or Azure), and Project type (for example, Desktop or Web). Кроме того, можно ввести искомый текст в поле поиска для дальнейшей фильтрации шаблонов, например asp.net.You can also enter search text into the search box to further filter the templates, for example, asp.net.
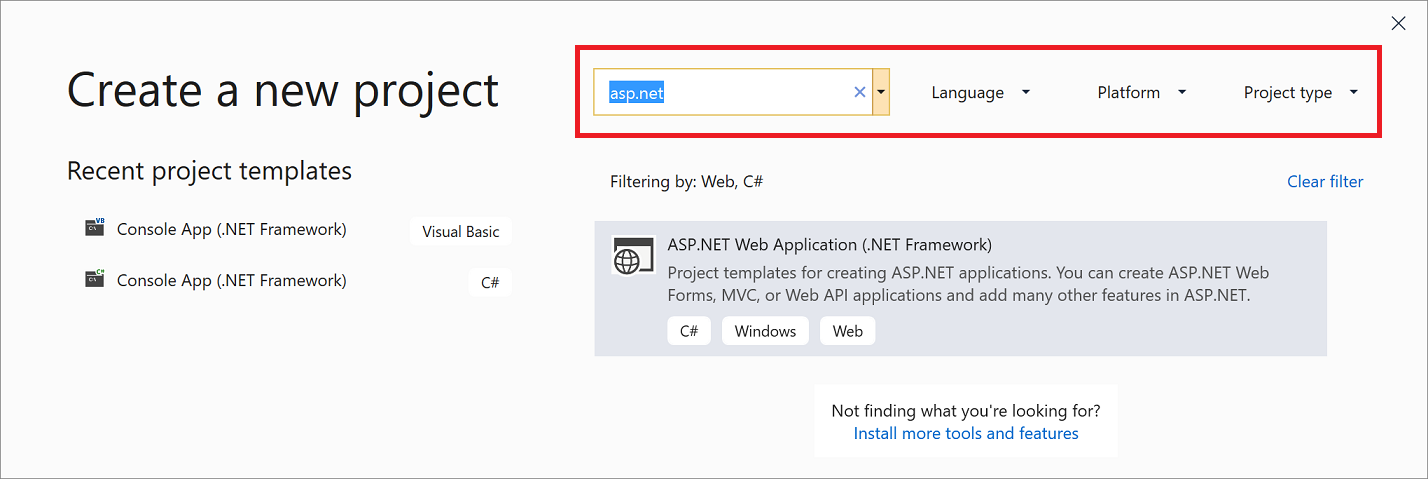
Теги, отображаемые под каждым шаблоном, соответствуют трем раскрывающимся фильтрам (язык, платформа и тип проекта).The tags that appear under each template correspond to the three dropdown filters (Language, Platform, and Project type).
Совет
Если вы не видите нужный шаблон, возможно, отсутствует рабочая нагрузка для Visual Studio.If you don’t see the template you’re looking for, you may be missing a workload for Visual Studio. Для установки дополнительных рабочих нагрузок, таких как Разработка для Azure или Разработка мобильных приложений на .NET, щелкните ссылку Установка других средств и компонентов, чтобы открыть Visual Studio Installer.To install additional workloads, for example, Azure Development or Mobile Development with .NET, click the Install more tools and features link to open Visual Studio Installer. В нем выберите рабочие нагрузки, которые нужно установить, а затем выберите Изменить.From there, select the workloads you want to install, and then choose Modify. После этого будут доступны дополнительные шаблоны проектов.After that, additional project templates will be available to choose from.
Выберите шаблон и нажмите кнопку Далее.Select a template and then click Next.
Использование свойств проекта в директивах сборки и включенияUse project properties in assembly and include directives
Макросы Visual Studio, такие как $ (SolutionDir) , не работают в MSBuild.Visual Studio macros like $(SolutionDir) don’t work in MSBuild. Вместо этого можно использовать свойства проекта.You can use project properties instead.
Измените файл CSPROJ или VBPROJ , чтобы определить свойство проекта.Edit your .csproj or .vbproj file to define a project property. В этом примере определяется свойство с именем милибфолдер:This example defines a property named myLibFolder:
Теперь можно использовать ваше свойство проекта в директивах assembly и include:Now you can use your project property in assembly and include directives:
Эти директивы получают значения из T4parameterValues как в узлах MSBuild, так и в узлах Visual Studio.These directives get values from T4parameterValues both in MSBuild and in Visual Studio hosts.
SSMS System Requirements
The current release of SSMS supports the following 64-bit platforms when used with the latest available service pack:
Supported Operating Systems:
- Windows 10 (64-bit) version 1607 (10.0.14393) or later
- Windows 8.1 (64-bit)
- Windows Server 2019 (64-bit)
- Windows Server 2016 (64-bit)
- Windows Server 2012 R2 (64-bit)
- Windows Server 2012 (64-bit)
- Windows Server 2008 R2 (64-bit)
Supported hardware:
- 1.8 GHz or faster x86 (Intel, AMD) processor. Dual-core or better recommended
- 2 GB of RAM; 4 GB of RAM recommended (2.5 GB minimum if running on a virtual machine)
- Hard disk space: Minimum of 2 GB up to 10 GB of available space
Note
SSMS is available only as a 32-bit application for Windows. If you need a tool that runs on operating systems other than Windows, we recommend Azure Data Studio. Azure Data Studio is a cross-platform tool that runs on macOS, Linux, as well as Windows. For details, see Azure Data Studio.
Как получить доступ к папке
Использование режима «Скачать все и установить»Use the «Download all, then install» feature
: Загрузив веб-установщик, выберите в Visual Studio Installer новый режим Скачать все и установить.: After you download the web installer, select the new Download all, then install option from the Visual Studio Installer. После этого продолжите установку.Then, continue with your installation.
загрузив веб-установщик, выберите в Visual Studio Installer новый режим Скачать все и установить.After you download the web installer, select the new Download all, then install option from the Visual Studio Installer. После этого продолжите установку.Then, continue with your installation.
Режим «Скачать все и установить» позволяет скачать Visual Studio в виде отдельного установщика для компьютера, на который он скачивается.We designed the «Download all, then install» feature so that you can download Visual Studio as a single installation for the same computer on which you downloaded it. Это позволяет безопасно отключиться от Интернета перед установкой Visual Studio.That way, you can safely disconnect from the web before you install Visual Studio.
Важно!
Не используйте этот режим, чтобы создать автономный кэш для передачи на другой компьютер.Do not use the «Download all, then install» feature to create an offline cache that you intend to transfer to another computer. Он не предназначен для этого.It’s not designed to work that way. Вы можете создать автономный (локальный) кэш для установки Visual Studio на другом компьютере. Сведения о создании локального кэша см. в разделе этой статьи, а сведения о создании сетевого кэша — в статье Создание сетевой установки Visual Studio.If you want to create an offline cache to install Visual Studio on another computer, see the section of this page for information about how to create a local cache, or the Create a network installation of Visual Studio page for information about how to create a network cache.
Создание проектаCreate a project
Сначала создадим новый проект приложения для универсальной платформы Windows.First, create a Universal Windows Platform project. Для этого типа проекта уже имеются все нужные файлы шаблонов, что избавляет вас от лишней работы.The project type comes with all the template files you need, before you’ve even added anything!
-
Запустите Visual Studio.Open Visual Studio.
-
В верхней строке меню последовательно выберите Файл > Создать > Проект.From the top menu bar, choose File > New > Project.
-
В левой панели диалогового окна Новый проект разверните узел Visual C# и выберите Универсальные приложения.In the left pane of the New Project dialog box, expand Visual C#, and then choose Windows Universal. В средней панели выберите Пустое приложение (универсальное приложение Windows) .In the middle pane, choose Blank App (Universal Windows). Назовите проект HelloWorld и нажмите OK.Then, name the project HelloWorld and choose OK.
Примечание
Убедитесь, что исходный проект находится на отформатированном диске NTFS, например на диске операционной системы (ОС).Make sure that the location of the source project is on a New Technology File System (NTFS) formatted drive, such as your Operating System (OS) drive. В противном случае могут возникнуть проблемы при сборке и выполнении проекта.Otherwise, you might have trouble building and running your project.
Примечание
Если шаблон проекта Пустое приложение (универсальное приложение Windows) отсутствует, щелкните ссылку Открыть установщик Visual Studio в левой области диалогового окна Новый проект.If you don’t see the Blank App (Universal Windows) project template, click the Open Visual Studio Installer link in the left pane of the New Project dialog box.Запускается Visual Studio Installer.The Visual Studio Installer launches. Выберите рабочую нагрузку Разработка приложений для универсальной платформы Windows и выберите Изменить.Choose the Universal Windows Platform development workload, and then choose Modify.
-
Подтвердите значения по умолчанию для параметров Целевая версия и Минимальная версия в диалоговом окне Новый проект приложения для универсальной платформы Windows.Accept the default Target version and Minimum version settings in the New Universal Windows Platform Project dialog box.
-
Откройте Visual Studio и в начальном окне выберите Создать проект.Open Visual Studio, and on the start window, choose Create a new project.
-
На экране Создание проекта введите в поле поиска Универсальная платформа Windows, выберите шаблон C# Пустое приложение (универсальная платформа Windows) и щелкните Далее.On the Create a new project screen, enter Universal Windows in the search box, choose the C# template for Blank App (Universal Windows), and then choose Next.
Примечание
Если вы не видите здесь шаблон Пустое приложение (универсальное приложение Windows) , щелкните ссылку Установка других средств и компонентов.If you don’t see the Blank App (Universal Windows) project template, click the Install more tools and features link.Запускается Visual Studio Installer.The Visual Studio Installer launches. Выберите рабочую нагрузку Разработка приложений для универсальной платформы Windows и выберите Изменить.Choose the Universal Windows Platform development workload, and then choose Modify.
-
Присвойте проекту имя HelloWorld и нажмите кнопку Создать.Give the project a name, HelloWorld, and choose Create.
-
Подтвердите значения по умолчанию для параметров Целевая версия и Минимальная версия в диалоговом окне Новый проект приложения для универсальной платформы Windows.Accept the default Target version and Minimum version settings in the New Universal Windows Platform Project dialog box.
Примечание
При первом использовании Visual Studio для создания приложения UWP появится диалоговое окно Параметры.If this is the first time you have used Visual Studio to create a UWP app, a Settings dialog box might appear. Выберите Режим разработчика, затем нажмите Да.Choose Developer mode, and then choose Yes.Visual Studio установит дополнительный пакет режима разработчика.Visual Studio installs an additional Developer Mode package for you. После завершения установки пакета закройте диалоговое окно Параметры.When the package installation is complete, close the Settings dialog box.
Get support
Sometimes, things can go wrong. If your Visual Studio installation fails, see Troubleshoot Visual Studio installation and upgrade issues for step-by-step guidance.
We also offer an (English only) support option for installation-related issues.
Here are a few more support options:
- Report product issues to us via the Report a Problem tool that appears both in the Visual Studio Installer and in the Visual Studio IDE.
- Suggest a feature, track product issues, and find answers in the Visual Studio Developer Community.
- Use your GitHub account to talk to us and other Visual Studio developers in the Visual Studio conversation in the Gitter community.
Использование 64-разрядной ОСUse a 64-bit OS
При переходе с 32-разрядной на 64-разрядную версию Windows вы увеличиваете объем виртуальной памяти, доступной Visual Studio, с 2 до 4 ГБ.If you upgrade your system from a 32-bit version of Windows to a 64-bit version, you expand the amount of virtual memory available to Visual Studio from 2 GB to 4 GB. Это позволяет Visual Studio обрабатывать значительно большие рабочие нагрузки даже несмотря на то, что это 32-разрядный процесс.This enables Visual Studio to handle significantly larger workloads, even though it is 32-bit process.
Дополнительные сведения см. в разделах Ограничения памяти и Использование /LARGEADDRESSAWARE в 64-разрядной версии Windows.For more information, see Memory limits and Use /LARGEADDRESSAWARE on 64-bit Windows.
Шаг 4. Выбор рабочих нагрузокStep 4 — Choose workloads
Когда завершится установка программы установки, вы можете с ее помощью выбрать нужные наборы функций (рабочих нагрузок).After the installer is installed, you can use it to customize your installation by selecting the feature sets—or workloads—that you want. Ниже описывается порядок действий.Here’s how.
-
Найдите нужную рабочую нагрузку в Visual Studio Installer.Find the workload you want in the Visual Studio Installer.
Например, выберите рабочую нагрузку «Разработка классических приложений .NET».For example, choose the «.NET desktop development» workload. В нее входит основной редактор кода по умолчанию, который предоставляет базовую поддержку редактирования кода для более чем 20 языков, возможность открывать и изменять код в любой папке без наличия проекта и интегрированное управление исходным кодом.It comes with the default core editor, which includes basic code editing support for over 20 languages, the ability to open and edit code from any folder without requiring a project, and integrated source code control.
-
Выбрав нужные рабочие нагрузки, нажмите кнопку Установить.After you choose the workload(s) you want, choose Install.
Далее будут отображаться экраны состояния, на которых демонстрируется ход установки Visual Studio.Next, status screens appear that show the progress of your Visual Studio installation.
-
Найдите нужную рабочую нагрузку в Visual Studio Installer.Find the workload you want in the Visual Studio Installer.
Например, выберите рабочую нагрузку «ASP.NET и разработка веб-приложений».For example, choose the «ASP.NET and web development» workload. В нее входит основной редактор кода по умолчанию, который предоставляет базовую поддержку редактирования кода для более чем 20 языков, возможность открывать и изменять код в любой папке без наличия проекта и интегрированное управление исходным кодом.It comes with the default core editor, which includes basic code editing support for over 20 languages, the ability to open and edit code from any folder without requiring a project, and integrated source code control.
-
Выбрав нужные рабочие нагрузки, нажмите кнопку Установить.After you choose the workload(s) you want, choose Install.
Далее будут отображаться экраны состояния, на которых демонстрируется ход установки Visual Studio.Next, status screens appear that show the progress of your Visual Studio installation.
Совет
В любой момент после установки можно установить рабочие нагрузки или компоненты, которые не были установлены изначально.At any time after installation, you can install workloads or components that you didn’t install initially. Если среда Visual Studio открыта, выберите пункт Сервис > Получить средства и компоненты… ; откроется Visual Studio Installer.If you have Visual Studio open, go to Tools > Get Tools and Features… which opens the Visual Studio Installer. Visual Studio Installer можно также открыть из меню «Пуск».Or, open Visual Studio Installer from the Start menu. Здесь можно выбрать рабочие нагрузки или компоненты, которые нужно установить.From there, you can choose the workloads or components that you wish to install. Затем выберите Изменить.Then, choose Modify.
Из-за чего могут пропасть SMS
Создание кроссплатформенных приложений и игрBuild cross-platform apps and games
С помощью Visual Studio вы можете создавать приложения и игры для платформ macOS, Linux и Windows, а также для мобильных устройств Android, iOS и др.You can use Visual Studio to build apps and games for macOS, Linux, and Windows, as well as for Android, iOS, and other mobile devices.
-
Создавайте приложения .NET Core для использования на устройствах Windows, macOS и Linux.Build .NET Core apps that run on Windows, macOS, and Linux.
-
Создавайте мобильные приложения для устройств iOS, Android и Windows на C# и F# с помощью Xamarin.Build mobile apps for iOS, Android, and Windows in C# and F# by using Xamarin.
-
Используйте стандартные веб-технологии—HTML, CSS и JavaScript—, чтобы создавать мобильные приложения для устройств iOS, Android и Windows с помощью Apache Cordova.Use standard web technologies—HTML, CSS, and JavaScript—to build mobile apps for iOS, Android, and Windows by using Apache Cordova.
-
Создавайте игры в форматах 2D и 3D на C# с помощью средств Visual Studio для Unity.Build 2D and 3D games in C# by using Visual Studio Tools for Unity.
-
Создавайте собственные приложения C++ для устройств iOS, Android и Windows.Build native C++ apps for iOS, Android, and Windows devices. Предоставляйте доступ к общему коду в библиотеках, созданных для iOS, Android и Windows, с помощью C++ для кроссплатформенной разработки.Share common code in libraries built for iOS, Android, and Windows, by using C++ for cross-platform development.
-
Выполняйте развертывание, тестирование и отладку приложений Android с помощью эмулятора Android.Deploy, test, and debug Android apps with the Android emulator.
УдалениеUninstall
Набор SSMS имеет общие компоненты с другими решениями, которые останутся установленными после его удаления.There are shared components that remain installed after you uninstall SSMS.
Сюда входят следующие компоненты:The shared components that remain installed are:
- Azure Data StudioAzure Data Studio
- Microsoft .NET Framework 4.7.2Microsoft .NET Framework 4.7.2
- Драйвер Microsoft OLE DB для SQL ServerMicrosoft OLE DB Driver for SQL Server
- Microsoft ODBC Driver for SQL Server версии 17Microsoft ODBC Driver 17 for SQL Server
- Распространяемый компонент Microsoft Visual C++ 2013 (x86)Microsoft Visual C++ 2013 Redistributable (x86)
- Распространяемый компонент Microsoft Visual C++ 2017 (x86)Microsoft Visual C++ 2017 Redistributable (x86)
- Распространяемый компонент Microsoft Visual C++ 2017 (x64)Microsoft Visual C++ 2017 Redistributable (x64)
- Microsoft Visual Studio Tools for Applications 2017Microsoft Visual Studio Tools for Applications 2017
Эти компоненты не удаляются, так как могут являться общими с другими продуктами.These components aren’t uninstalled because they can be shared with other products. Их удаление может нарушить работу этих продуктов.If uninstalled, you may run the risk of disabling other products.
РешенияSolutions
Проект находится внутри решения.A project is contained within a solution. Несмотря на название, под решением не подразумевается «решение вопроса».Despite its name, a solution is not an «answer». Это просто контейнер для одного или нескольких связанных проектов вместе с информацией о сборке, параметрами окна Visual Studio и любыми прочими файлами, которые не относятся к какому-либо конкретному проекту.It’s simply a container for one or more related projects, along with build information, Visual Studio window settings, and any miscellaneous files that aren’t associated with a particular project. Решение описывается текстовым файлом (SLN) в собственном уникальном формате; его обычно не изменяют вручную.A solution is described by a text file (extension .sln) with its own unique format; it’s not intended to be edited by hand.
В Visual Studio используются два типа файлов (SLN и SUO) для хранения параметров, связанных с решениями:Visual Studio uses two file types (.sln and .suo) to store settings for solutions:
| РасширениеExtension | nameName | ОписаниеDescription |
|---|---|---|
| .SLN.sln | Решение Visual StudioVisual Studio Solution | Организует проекты, элементы проектов и решений в решении.Organizes projects, project items, and solution items in the solution. |
| SUO.suo | Параметры пользователя решенияSolution User Options | Сохраняет настройки и параметры уровня пользователя, например точки останова.Stores user-level settings and customizations, such as breakpoints. |
Предыдущие версииPrevious versions
Эта статья применима только к последней версии SSMS.This article is for the latest version of SSMS only. Предыдущие версии SSMS можно скачать на .To download previous versions of SSMS, visit .
Примечание
В декабре 2021 г. выпуски SSMS до версии 18.6 перестанут использовать многофакторную проверку подлинности через Azure Active Directory.In December 2021, releases of SSMS prior to 18.6 will no longer authenticate through Azure Active Directory with MFA.
Чтобы и дальше использовать проверку подлинности Azure Active Directory с MFA, установите SSMS 18.6 или более поздней версии.To continue utilizing Azure Active Directory authentication with MFA, you need SSMS 18.6 or later.
5) Установите GetFLV Player
.NET.NET
-
Для приложений Windows Forms на .NET 5 реализован полноценный интерфейс конструктораWindows Forms .NET 5 applications have full designer experience
- Включение локализации Enable Localization
- Поддержка печати Enable Printing
- Элементы можно добавлять на панель элементов в новом конструкторе Items can be added to the Toolbox in the new designer
- Сторонние поставщики компонентов могут включить свои элементы управления в конструкторе WinForms Core Third-party component vendors can enable their controls in WinForms Core designer
- Использование элементов управления «Общие» и «Все формы Windows Forms» Use «Common» controls & «All Windows Forms» controls
- Использование диалоговых окон Use Dialogs
- Использование меню и панелей инструментов Use Menus & Toolbars
- Использование пользовательских элементов управления и расширяемости Use User Controls & Extensibility
- Приложение WinForms VB .NET 5 имеет опыт работы с конструктором WinForms VB .NET 5 applications have designer experience
- Поддержка возможностей, связанных с данными Enable data-related experiences
- Новый конструктор WinForms имеет хорошую производительность New WinForms designer has good performance
- Использование унаследованных диалоговых оконUse Inherited dialogs
-
Использование эффективных встроенных возможностей для распространенных задач разработкиUse built-in productive capabilities for common development tasks
- Рефакторинг явного приведения для добавления явного приведения, если выражение является неявнымAdd Explicit Cast Refactoring to allow you to to add an explicit cast when an expression is implicit
- Автоматическое добавление заголовков в исходные файлы после настройки с помощью EditorConfig Add headers to source files automatically once configured using EditorConfig
- Добавление параметра при использовании изменения сигнатуры метода Enable adding parameter while using Change Method Signature
- Доставка анализаторов кода в пакете SDK для быстрой доставки новых функций пользователям Enable delivering code analyzers in SDK to deliver new features faster to users
- Рефакторинг с извлечением суперкласса для извлечения определенных элементов из выбранного класса в новый базовый класс Extract Superclass Refactoring to allow you to extract certain members from a selected class into a new base class
- Встроенный рефакторинг метода для выполнения действия, обратного извлечению метода Inline Method Refactoring to allow you to do the reverse of extract method
- Подсказки для имен встроенных параметров Inline Parameter Name Hints
- Перемещение анализаторов IDE в пакет NuGet для поддержки CI Moving IDE analyzers to NuGet package for CI support
- Новое предупреждение и исправление кода для удаления ненужных подавлений прагмы New warning and code fix to remove unnecessary pragma suppressions
-
Повышение удобства использования в проектахUse improvements in Projects
- Поддержка ссылок на пакеты в интерфейсе командной строки C++ Package references support in C++ CLI
- Добавлена поддержка вложения файлов во всех типах проектовAdd support for file nesting in all project types
- Правильность узла зависимостей и повышение удобства использованияDependencies node correctness and improved usability
-
.NET лучше всего работает в Azure.NET runs best on Azure
- Включение поддержки Функций Azure версии 3 в инструментах Enable Azure Functions v3 support in tools
- Улучшение возможностей публикации для Службы приложений в Linux Improve publish experience for App Service Linux
-
Улучшение возможностей тестирования для разработчиков .NET CoreImprove test experiences for developers on .NET Core
Поддержка Fakes на .NET CoreFakes support for .NET Core
- Создание и изменение файлов YAML с помощью цветов и lintingCreate and edit YAML files with colorization and linting
Примеры:Examples:
В следующих примерах используется база данных AdventureWorksPDW2012AdventureWorksPDW2012.The following examples use the AdventureWorksPDW2012AdventureWorksPDW2012 database.
В этом разделе приведены три примера кода.This section shows three code examples. В ходе выполнения первого примера кода возвращаются все строки (предложение WHERE не указано), а также все столбцы (используется ) таблицы .This first code example returns all rows (no WHERE clause is specified) and all columns (using the ) from the table.
В этом примере для достижения такого же результата используется присвоение псевдонима таблице.This next example using table aliasing to achieve the same result.
В ходе выполнения данного примера кода возвращаются все строки (предложение WHERE не задано) и подмножества столбцов (, , ) таблицы базы данных .This example returns all rows (no WHERE clause is specified) and a subset of the columns (, , ) from the table in the database. Заголовок третьего столбца переименовывается в .The third column heading is renamed to .
Этот пример возвращает только строки для , имеющие , не равное NULL, и , равное «M» (состоит в браке).This example returns only the rows for that have an that is not NULL and a of ‘M’ (married).
В.C. Совместное использование DISTINCT и SELECTUsing DISTINCT with SELECT
В следующем примере используется для создания списка всех уникальных должностей в таблице .The following example uses to generate a list of all unique titles in the table.
Г.D. Использование GROUP BYUsing GROUP BY
В следующем примере вычисляется общий объем всех продаж за каждый день.The following example finds the total amount for all sales on each day.
Так как в запросе используется предложение , то выводится только одна строка, содержащая общий объем продаж по каждому дню.Because of the clause, only one row containing the sum of all sales is returned for each day.
Д.E. Использование GROUP BY с несколькими группамиUsing GROUP BY with multiple groups
В следующем примере вычисляются значения средней цены и суммы продаж через Интернет за каждый день, сгруппированные по дате заказа и ключу продвижения.The following example finds the average price and the sum of Internet sales for each day, grouped by order date and the promotion key.
Е.F. Использование GROUP BY и WHEREUsing GROUP BY and WHERE
В следующем примере после извлечения строк, содержащих даты заказов позднее 1 августа 2002 г., происходит их разделение на группы.The following example puts the results into groups after retrieving only the rows with order dates later than August 1, 2002.
Ж.G. Использование GROUP BY с выражениемUsing GROUP BY with an expression
В следующем примере производится группировка с помощью выражения.The following example groups by an expression. Группировку можно производить только с помощью выражения, не содержащего агрегатных функций.You can group by an expression if the expression does not include aggregate functions.
З.H. Использование GROUP BY с ORDER BYUsing GROUP BY with ORDER BY
В следующем примере вычисляется сумма продаж за день и выполняется поиск заказов по определенному дню.The following example finds the sum of sales per day, and orders by the day.
И.I. Использование предложения HAVINGUsing the HAVING clause
Для ограничения результатов поиска в этом запросе используется предложение .This query uses the clause to restrict results.
Visual Studio 2019 version 16.8.2
released November 19, 2020
Issued Addressed in this Release of Visual Studio 2019 version 16.8.2
- Fixed for optimization bug in loops.
- Fixed internal compiler error in implementation of guaranteed copy elision (C++17 feature).
- Fixed build perf regression for large uses of anonymous types.
- Resolved an issue where a gold bar with the message «Specified argument was out of the range of valid values» would appear when editing C# code.
- Fixed an issue that could cause a MissingMethodException when building a project that had T4 templates.
- Fixes an issue where the search in the New Project Dialog could return zero results.
From Developer Community
- KeyNotFoundException reported by SolutionAssetStorage.GetAssetAsync results in gold bar
- IntelliSense fails because designtime build can’t find ‘GetClCommandLineForReference’ target
- IOException (Pipe is broken) reported by GetAssetAsync
- Search is not working
- Optimizer incorrectly removed EH information causing some exceptions to crash