Прошивка android-устройств samsung через программу odin
Содержание:
- Как установить кастомное рекавери (recovery) при помощи программы Odin
- Odin Options Explained
- What is Download Mode / Odin Mode?
- Прошивка через Odin главные правила
- Происхождение термина
- Download Odin3 v3.12.3 – Samsung Odin flash tool
- Odin 3.09.5 Download Samsung Flash tool – New version
- Odin 3.14.1 and 3.14.4 download; Reliable Samsung ROM flashing software
- Odin 3.12.10 – Download Odin3 Latest Version
- Download Heimdall Flashing Tool For Samsung Galaxy
- Как выйти из режима Downloading на Samsung
- Подготовка к переустановке системы
- Компьютер не включается — поиск причины поломки
- Подобно об Odin
- Odin и прошивка Samsung — правила
- Features of Samsung Odin
- Odin 3.09 Download Samsung tool (v3.09)
- Часть 1: Что такое Odin Mode?
- Какую версию Odin скачать?
- Tutorial for ROM Flash with Samsung Odin 3.13.1
- Что нужно знать перед прошивкой телефона или планшета: основные правила
- What Odin Version to Use to Flash Samsung Firmware
Как установить кастомное рекавери (recovery) при помощи программы Odin
Перед тем как приступить к процессу установки (прошития) кастомного рекавери вам следует скачать его к себе на ПК. Узнать больше о рекавери можно из статьи «Что такое режим рекавери и как в него зайти?».
Загрузить рекавери для своей модели смартфона/планшета можно по следующим ссылкам:
-
ROM Manager
Разработчик:
ClockworkMod4.35
- TWRP recovery
- Philz Touch recovery
Сам процесс прошивки рекавери состоит из нескольких простейших действий:
- Запускаем Odin и нажимаем на кнопку «AP», после чего выбираем скачанный файл рекавери с расширением .tar или .tar.md5.
- Переходим во вкладку «Options» и устанавливаем галочки только напротив пунктов «Auto Reboot» и «F. Reset Time», остальные должны быть сняты. (Галочка «Auto Reboot» может привести к сбросу рекавери до заводского состояния, на некоторых устройствах первым делом нужно запустить прошитое кастомное рекавери, а уже после перезагружать его. Перед прошивкой своего смартфона/планшета не забудьте уточнить данный момент).
- Теперь останется лишь нажать на кнопку «Start» и дождаться завершения процесса прошивки. Помните, что в этот момент нельзя выключать компьютер и отсоединять устройство.
- Как только прошивка закончится ваш девайс автоматически перезагрузится и его можно будет отключить от ПК.
Odin Options Explained
When you launch Samsung Odin, you’ll be greeted by the Odin window and will see a variety of buttons with options like BL, AP, CP, CSC, UserData, and PIT. If you are not aware of these terms, I have them explained below for better understanding.
- Auto Reboot: This option is enabled by default in Odin. Keep it that way if you are going to flash the stock firmware. However, due to bootloader encryption on most Samsung devices, you’ll need to disable ‘Auto Reboot‘ before flashing TWRP or any custom recovery.
- Nand Erase: If you select this option in Odin, it will completely erase everything on your Samsung device including the Operating System and all data present on it. If you don’t know what you’re supposed to do after performing a ‘Nand Erase‘, you’ll end up turning your device into an expensive paperweight.
- Re-Partition: The option should be checked only if you flashing a Samsung PIT file along with the firmware. Enabling ‘Re-Partition’ will re-partition your Samsung device to its default state. Don’t use this option unless you understand what partitioning is.
- F Reset Time: Check this option only if you want to reset the firmware flashing timer on your device.
- BP: This means Bootloader and as it’s evident from the very name, it’s used to flash the bootloader file with .tar or .tar.md5 extension.
- AP: On the older versions of Odin, this option was called PDA and was used to flash single-file firmware, recovery, and CF-Root files. The full-fledged name of AP is ‘Android Processor’.
- CP: CP stands for ‘Core Processor’ and is used to flash the Modem file that comes with the Samsung firmware binaries package. In the older versions of Odin, this option was called Phone.
- CSC: The full-form of CSC is ‘Consumer Software Customization’ or ‘Country Specific Code’. The CSC component of a Samsung firmware is specific to network providers and geographical region. In other words, it contains customizations related to a geographical location, APN settings, carrier branding, and other things. Learn more about Samsung CSC and Home CSC.
- PIT: or Partition Information Table contains information such as device storage partition tables, partition name, block size, block count, and other technical stuff. Every device has a different PIT file associated with it. PIT files are not meant to be flashed unless a device’s partition table layout has been corrupted for some reason.
Odin is Samsung’s official firmware flash tool and it was developed by the manufacturer only to be used in their service centers. What you find on the Internet are the leaked or unofficially distributed versions of the software.
Once you have downloaded the latest Samsung Odin, you will need to download the proper firmware binaries for your device. You can download them directly from the Samsung Firmware Update Server using the Frija firmware download tool.
What is Download Mode / Odin Mode?
Most Samsung devices do come with unlocked bootloaders right out of the box which is a big plus as competing brands ship their devices with a locked bootloader. Thanks to this factor alone, Samsung devices generally get the best third-party developer support in the form of custom ROMs, recoveries. Most of these mods generally rely on a custom recovery, which itself first needs to be flashed through Odin hence requiring you to know how to access download mode if you want to modify your Galaxy device.
Odin is an internal tool at Samsung that allows them to flash various firmware and files on to the brand’s phones and tablets. There are many releases of Odin available online, and you can download them all here. After the phone is connected to your PC in Download Mode, Odin will detect the device and if the connection is successful, it will set up a communication port between the phone and the computer. That will allow you to flash different packages on to your Samsung Galaxy phone.
A word of caution, do not mess around with Odin while in the Download Mode of your phone. It can cause serious damage to your device, beyond repair. And not to forget, anything you do in Download Mode is not covered in your official Samsung device warranty. Therefore, we recommend you use a specific guide or a detailed tutorial rather than experimenting on your own. You can find a really good guide on our website.
You can also use Odin to downgrade your Galaxy phone from a specific Android release or build number to another one. This comes in handy when a newer firmware causes slow downs, long boots or even crashes.
Just by accessing the Download Mode, you will not lose your warranty by Samsung. However, if you flash custom files like a ROM or root package which Samsung doesn’t officially intend, your warranty will be void. These custom files are generally those which are created by third-party developers and are not signed by Samsung. We think this is the only downside once you try to customize your phone through Download Mode and we also warn of this in every post we cover.
NOTE: Screenshots below may be of a different Samsung device, but should have similar screen on your phone as well.
Прошивка через Odin главные правила
Необходимо знать, что никогда не следует прошивать Samsung через программы Kies или Smart Switch, причина вот в чем:
Не в полной мере загруженные прошивки с сервера компании Samsung.
Некачественные прошивочные файлы Android, благодаря чему устройство регулярно перезапускается (не удаляется раздел /data).
Прошивать смартфон исключительно программой Odin
Прошивать обязательно с зарядом аккумулятора не меньше 50% и стабильным электропитанием на ПК.
Не дергать USB кабель в процессе прошивания смартфона.
Нужен фирменный и неповрежденный USB провод.
Важно пользоваться только оригинальным USB проводом идущий в комплектации с устройством. Используя некачественные провода, вы рискуете превратить свой смартфон в кирпич.
Путь к прошивке должен быть без русских букв (C: папка — не верно, C: или С: samsung — верно).
Происхождение термина
Прошивкой раньше называли содержимое памяти компьютера. Жёстких дисков тогда не было, использовалась память на магнитных сердечниках. Называли такие машины ПЗУ (постоянное запоминающее устройство). Память состояла из П- и Ш-образных сердечников с небольшим зазором в 1 мм, в который укладывался провод. В одном положении провод означал «0», в другом «1». Провод тянули вручную, с помощью приспособления «карандаш», который напоминал иголку. И вот эту муторную и кропотливую работу называли «прошивкой». В результате почти всегда получались ошибки, исправить которые можно было лишь отрезав провод и уложив его в нужное положение (1 или 0). Это называлось перепрошивкой.
Со временем слово прижилось в мобильных технологиях. На границе тысячелетий программисты и инженеры на сленге стали говорить «перепрошить устройство», вместо «переустановить систему».
Download Odin3 v3.12.3 – Samsung Odin flash tool
Posted by Odin
— Last updated on July 8th, 2020
in Android
Download Odin 3 – The Best Flashing tool Here is the latest Odin Download tool Odin 3.11.2 and Odin v3.12.3. You can Odin download. Download Samsung Odin 3.10 version here. The latest Popular Samsung ROM Flashing Tool for Android devices. Find the below Samsung download Odin3 All versions links. Watch out the video guide for how to use the Latest Version of Samsung Odin3 Download. You have Samsung Android Device and now you want to flash your ROM. You might have heard of this small tool name Odin tool. The Most popular Samsung ROM flashing tool is the Odin3. Easy to use and have too many…
Odin 3.09.5 Download Samsung Flash tool – New version
Posted by Odin
— Last updated on June 19th, 2019
in Samsung
Odin 3.09.5 On this page, you will find the link to download Odin flash tool on your Computer. This is the latest version of Odin 3.09 released on 1 November 2017. The Odin 3.09.5 comes in a zip package, which contains Flash Tool, Driver and How-to Manual. You can use this powerful tool Odin Download (Wiki) for Flash or Root your device, Android Custom ROM, install Official Samsung Firmware, Official OTA Updates, kernels. It is also used as a way of unbricking an Android device. ODIN3 v3.09.5 works well with latest devices. You can find the Download link below. Odin 3.09…
Odin 3.14.1 and 3.14.4 download; Reliable Samsung ROM flashing software
Posted by Odin
— Last updated on August 7th, 2020
in Samsung
Odin 3.14.1 and Odin 3.14.4 was released; You can easily Odin download on this page, without any issues. So, the stable release version is Odin 3.14.1. We are happy to say this is the very very first post for publishing the Odin 3.14 version. Most people like to know what is the Odin latest version 2020 available, Only thing is this is supported android new versions like Android 10, 9, 8, and more… Why Odin download v3.14 for Samsung phone’s firmware recover, re-install, boot loop issues fix, repair ROM, fix hanging, or dead issues. Most of Samsung’s latest devices now…
Odin 3.12.10 – Download Odin3 Latest Version
Posted by Odin
— Last updated on July 5th, 2020
in Samsung
On this page Available Latest release Odin3 Flash tool, Odin 3.12.10 most advanced version. You can find the Odin 3 Download link below on this page. Odin3 tool for Flash All Samsung Android Devices. Odin3 is a Flash tool, This is the best android flash tool for you want to flash any Samsung Smartphone or any device. Odin latest version finds here. This page mainly provides all Odin tool for free to Download. You can Find Here all Samsung Odin3 Download. The Odin3 shared on this page helps you to recover your device if you have software error, update error…
Download Heimdall Flashing Tool For Samsung Galaxy
Posted by Odin
— Last updated on June 19th, 2019
in Samsung
Heimdall is a flash tool for use Samsung Galaxy S device. Also, Heimdall tool is a cross-platform open-source tool suite used to flash ROMs onto Samsung Galaxy S devices. This software attempts to flash your Galaxy S device. Download Heimdall The latest release is available on this page. Download Heimdall flash tool also uses the Same protocol as Odin flash tool. Heimdall tested with a variety of phones flashing several different firmware versions resulting in a 100% success rate. Heimdall System Requirements USB communication in Heimdall is handled by the popular open-source USB library, libusb-1.0. Heimdall runs on Linux, OS…
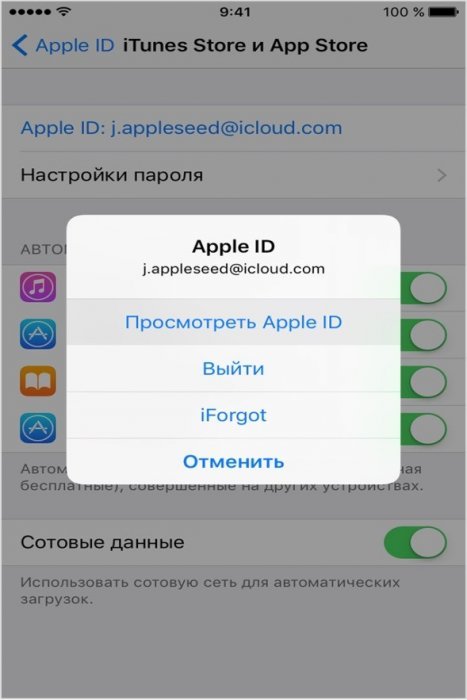
Как выйти из режима Downloading на Samsung
Теперь мы рассмотрим способы как можно выйти из режима Odin или Downloading и вернуть телефон к нормальной работе.
Стандартный выход из режима
Если вы попали в режим «Один» на Самсунге случайно, зажав не те кнопки при включении, то выйти из него не составит проблемы. Для этого на старых моделях с аппаратной кнопкой «Home» надо нажать на комбинацию клавиш Power + Home + Громкость вниз и держать их пока экран не станет чёрным. Теперь кнопки можно отпустить и ждать загрузку операционной системы смартфона в обычном режиме.

На тех моделях, где есть кнопка виртуального ассистента Bixby — Samsung Galaxy S10, S9, S8 — для входа и выхода из режима Downloading используется такая комбинация клавиш — Power + Громкость вверх + Bixby. Нажимаем их одновременно и держим так примерно 10 секунд. Как только экран погаснет — отпускаем.
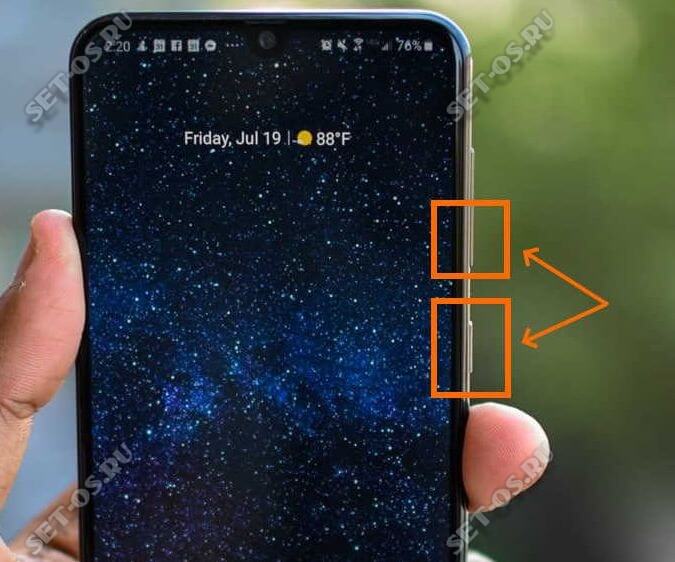
В современных бюджетных смартфонах Samsung Galaxy A10, A20, A30, A50 и т.п. есть всего 2 клавиши — включение и «качелька» громкости. Потому, на этих моделях кнопки для выхода из режима Downloading написаны сразу же на экране. Вот так:
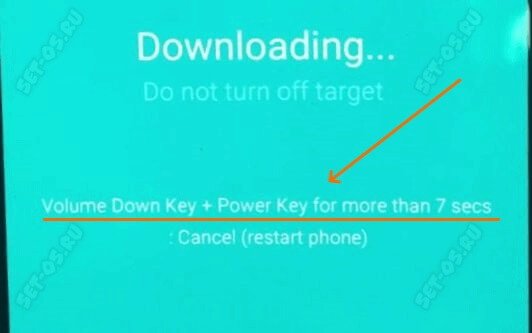
То бишь нужно нажать кнопку уменьшения громкости вместе с кнопкой выключения устройства и держать их нажатыми не менее 7 секунд, пока не погаснет дисплей.
Жесткая перезагрузка телефона
Второй простой способ — это перезапустить устройство через обычное выключение — Hard Restart. Для этого просто нажимаем кнопку Power и держим так секунд 10-15, пока гаджет полностью не отключится.
Затем, желательно бы снять батарею минут на 10-15 (на новых смартфонах это не удастся, т.к. аккумулятор несъёмный). После этого надо снова включить телефон в обычном режиме.
Если с устройством нет каких-то аппаратных или программных проблем, это должно убрать режим «Один» и сообщение «Do not turn off target».
Подготовка к переустановке системы
Для начала нужно скачать программу Odin, которая используется для прошивки устройств Samsung. Затем нужно скачать саму прошивку: официальную прошивку Samsung или любую кастомную (однофайловую в формате .tar или многофайловую в форматах .md5). Необходимо установить ADB-драйвера на компьютер, чтобы устройство беспрепятственно соединялось с компьютером по USB (обычно такие драйвера устанавливаются сами при подключении, но если этого не произошло, скачайте их на сайте Samsung либо установите универсальные ADB-драйвера от Google). И подготовьте целый, неповреждённый, оригинальный USB-кабель.
Компьютер не включается — поиск причины поломки
Подобно об Odin
Приложение было разработано для ОС Windows. Скачав программу, вы получаете возможность прошить свой телефон или планшет от Samsung. Некогда корейцы использовали утилиту только в качестве профессионального софта, внедряя обновления для своих девайсов. К счастью, файлы его просочились в интернет, что позволило использовать его каждому поклоннику Samsung. Скачать приложение можно на многих фан-сайтах, посвященных корейскому производителю или же Android-устройствам в целом. уже давно перестали быть опасными для ваших девайсов. Однако не все пользователи отваживаются на столь радикальные меры, избавляясь от стоковых и уходя в свободное плавание пиратских программ. Стоит отметить, что прошивка «Самсунг» через Odin позволит открыть новые возможности вашего устройства, недоступные в стоковых решениях.
Тут уж возникает дилемма, ведь многие люди устанавливают некое тождество, выглядящее следующим образом: перепрошивка = большой риск = потеря гарантии на устройство. Но все это лишь мифы, основанные на давних стереотипах. Нынче в мире просто безумное количество владельцев аппаратов Samsung, так что была предпринята мера по созданию софта, который бы подходил только для этих устройств и только в качественном виде. Именно Odin стал таким приложением, «прилетев» из мира скандинавской мифологии. И тут уж можно быть уверенными на все 100%, что своему телефону либо планшету вы точно не навредите, воспользовавшись данной программой.
Odin и прошивка Samsung — правила
Чтобы никаких проблем в процессе работы не возникло, нужно сразу уяснить себе некоторые правила и чётко соблюдать их. Очень часто их нарушение приводит к тому, что телефон превращается в «кирпич».
Итак, что надо делать при прошивке смартфона Samsung программой Odin, чтобы всё было хорошо:
- Перед прошивкой нужно полностью зарядить телефон и обеспечить компьютер бесперебойным питанием. Если бесперебойника нет, можно воспользоваться также полностью заряженным ноутбуком. Ведь если в процессе прошивки телефон или компьютер отключится, будет много проблем, поэтому такую ситуацию нужно исключить.
- Для прошивки нужно использовать оригинальный шнур USB, который шёл в комплекте с телефоном. Если взять какой-нибудь другой, процесс может пойти не по плану и завершиться неизвестно чем.
- В ходе прошивки ни в коем случае нельзя отключать шнур USB от компьютера или телефона. Прерывание процесса может закончиться фатально. Поэтому контролируйте, чтобы никто случайно не сделал вам такой сюрприз. Особенно это любят делать дети, притом мгновенно и незаметно.
- Путь к папке, в которой будут лежать файлы прошивки на компьютере, должен быть полностью англоязычным, без русских букв. То есть создайте её, например, на диске С или D, но не в папке «Мои документы» и не на рабочем столе. И назовите её также латинскими буквами.
В общем, эти несложные правила относятся к процедуре прошивки любых телефонов любыми программами. Просто помните, что процесс нельзя прерывать ни в коем случае. Пока он не закончится, лучше вообще не трогать компьютер и не запускать новые программы.
Features of Samsung Odin
One of the good things about Samsung devices is the easy availability of stock firmware binaries and even easier method for flashing them. Using Odin, you can not perform a range of actions listed below.
- Install stock firmware binaries manually.
- Update Samsung Galaxy devices with new firmware.
- In many cases, you can also downgrade the software or the build version on your Samsung device.
- You can use Odin to change the CSC (Country Specific Code) of your Galaxy device to change its localization configuration and get your preferred system language.
- You can fix the boot loop issue on your Samsung device by flashing the stock firmware.
- Install a custom recovery like TWRP to enjoy root privilege and custom ROMs.
- You can also flash modded or patched system images or custom kernels to enhance your device’s performance.
- If your device is not showing the full internal storage capacity (your phone has 512GB of internal storage but it’s showing just 256 GB, for example) or the IMEI is missing, you can download the Samsung PIT file and flash it using Odin to fix the issue.
- Odin can also be used to perform a NAND erase on your Samsung Galaxy device.
Boot your phone or tablet into the Download mode, connect it to your computer via USB, and follow the visual presentation of Samsung firmware installation steps. shown in the screenshot below.
Install BL, AP, CP, CSC in Odin
Odin 3.09 Download Samsung tool (v3.09)
Posted by Odin
— Last updated on July 8th, 2020
in Android
Odin 3.09 is a software/tool for Android Samsung devices firmware flashing software (Wiki). This is used for windows OS (Windows 7/8/10…), The Odin 3.09 is generally most using Odin version for flash Samsung android devices. Samsung Odin Download v3.09 tool can install Official Samsung Firmware. So, Odin3 Download the Latest version on this page. Also, read all the Details of Odin software and Odin download All versions here. Especially this software works only on Windows Operation system based desktop or laptops. Odin cannot install other operating systems, Same as Odin v3.09 If you are using any other desktop computer or laptop, Don’t…
Часть 1: Что такое Odin Mode?
Режим Samsung Odin, более известный как режим загрузки, это экран, который вы видите на устройстве Samsung при нажатии громкости вниз, кнопки питания и домашней вместе. Режим экрана Samsung Odin дает два варианта, а именно «Продолжить», нажав кнопку увеличения громкости и «Отмена», нажав на кнопку громкости вниз. Другой способ распознать режим Samsung Odin является то, что экран будет отображать треугольник с Android символ на нем и сообщение о том, «Загрузка».
Если вы нажмете на «Отмена», нажав клавишу громкости вниз, вы можете выйти из режима Samsung Odin и устройство перезагрузится. Если «Продолжить» дальше, вы будете перенаправлены на флэш-устройство или ввести новую прошивку.
Тем не менее, при нажатии на кнопку громкости вниз, но не в состоянии выйти из режима Samsung Odin, вы сказали, испытывают то, что называется Odin неудачей вопроса. В этой ситуации, ваш телефон не будет перезагружен и зависает на экране режима Samsung Odin. Только в том случае, если нажать клавишу увеличения громкости и перейти к перепрошивки ROM / прошивки, вы можете выйти из режима Samsung Odin, выполнив несколько простых шагов, которые объясняются в следующем сегменте.
Какую версию Odin скачать?
Существует большое количество версий прошивальщика, но большинство используют только некоторые из них. Так называемые “стабильные версии” – это версии Odin, при использовании которых вы в большинстве случаев получите положительный результат и живой девайс.
Стабильных версий несколько, какую из них скачать, зависит от смартфона, который будете прошивать:
- – для устройств старше 2011 года
- – для устройств выпущенных с 2011 по 2014 год
- – для устройств выпущенных после 2014 года
Разделение на самом деле условное и, как правило вместе с инструкцией по прошивке конкретной модели указывается и рекомендуемая версия Odin
Все самые актуальные версии Odin можно найти на сайтах:
- 4PDA
Tutorial for ROM Flash with Samsung Odin 3.13.1
Samsung Odin Download is the best and the fastest flashing application the specially created for troubleshooting all kind of Samsung devices. If some user met with a boot loop, application crash or other errors that related to applications officially you are allowed for flash the stock ROM of the Android device to beat these errors. Odin downlaod has created from official Samsung developers to use in their service centers. We are using a leaked version of this official application so you need not worry about incompatible issues or other matters arising while using the application as well. You are about to enjoy a lot of features that come with Android Odin 3.13.1 tool such as flashing stock, custom firmware, Kernels, recovery files and also root package. So this is not an ordinary tool, flashing root package allows you to gain administrator privileges as well. In this tutorial, you will be learned how to use Odin without any issue on your smartphone.
The most popular rooting tool for Samsung smartphones and tablets, has released its latest version Samsung Odin 3.13.1 for the public use. Therefore android users can get the optimum facility to reap the unseen beauty of rooting. Together with its latest version, Odin flash 3.13.1 new features accelerate the attraction of its users.
Warning!: Odin download is only compatible with Samsung smartphones, tablet personal computers and you have to engage with this procedure at your own risk because this is a general technical guide not specified for any specially mentioned model.
Please join and browse through ODIN COMMUNITY forum. You can find a detailed «how-to» guide unique to your android device/OS.
Requirements for Android Odin 3.13.1
- The requirement for new Samsung Odin 3.13.1 installation requires just a few driver installations and a USB cable. The installations are to support ADB and FASTBOOT tool installation, updated USB drive installation and the PIT and TAR file installation.
- A novice or an expert can meet with anything unusual during the rooting. It is not predictable that you are not going to face nay of the issues. Hence it is, therefore, useful to have a data backup also before the rooting is started. If anything goes wrong, your device gets bricked the data backup can help you to recover the important information. Hence we strictly advised maintaining a data backup before rooting your Samsung smartphone.
- Always remember, the latest comes with more sophisticated features. It is also common for Odin download 3.13.1. But the latest is not the best. Therefore it is your responsibility to check for the best version you need to deal with.
Что нужно знать перед прошивкой телефона или планшета: основные правила
- Прошивать устройство стоит только с помощью программы Odin. Ни в коем случае не используйте программу Kies, из-за этого могут возникнуть проблемы, телефон перестанет загружаться и включаться, потому что раздел /data не будет стёрт.
- Прошивать устройство нужно, только когда у него 100% заряда батареи, а компьютер подключён к бесперебойному питанию. Любое отключение электричества может нарушить работу устройства.
- Во время прошивки нельзя вытаскивать USB-шнур. Прерывать прошивку нельзя, недоустановленная прошивка не даст включить устройство. Поэтому до кабеля лучше даже не дотрагиваться.
- Используйте только оригинальные USB-кабели. Сторонние, особенно дешёвые китайские, шнуры могут быть сделаны некачественно, из-за чего сигнал прервётся и прошивка не установится на устройство.
- Адрес папки, в которой лежит прошивка, не должен содержать кириллических символов. Ни одной русской буквы в адресе быть не должно, только английские.