Как установить на windows apache 2.4 и php 7
Содержание:
- Первичная установка
- Оригинальный httpd.conf
- Удаление службы используя командную строку
- Таблица совместимости версии Apache и ОС Microsoft Windows
- Apache Flink 1.11.2
- Setup from source via Visual Studio C++ (recommended)
- Примеры стихотворений
- Сервер 1С:Предприятие на Ubuntu 16.04 и PostgreSQL 9.6, для тех, кто хочет узнать его вкус. Рецепт от Капитана
- 17 February 2020 — POI 4.1.2 available
- Verify
- Running Apache as a Console Application
- Binary Releases
- Как работает веб-сервер Apache?
- Project News
- Копирование числовых ячеек из 1С в Excel Промо
- Download Apache Tika
- Рейтинг лучших электрошашлычниц 2020-2019
- Running Apache as a Service
- Запуск сервера и проверка настройки
- Современный телевизор не включается, а индикатор горит: что делать
- Возможные проблемы
- Распаковка архива Apache
- PGP Signatures
- Сборка Apache + PHP + MySQL + phpMyAdmin
Первичная установка
Для установки потребуется как минимум операционная система Windows XP SP3 (для этой устаревшей версии понадобится Web-сервер, сборка которого выполнена компилятором VC9 или VC10). Современные сборки Apache операционную систему Windows 2000 не поддерживают.
Дистрибутивный пакет Apache для Windows можно загрузить с сайта одного из двух «официальных» поставщиков: Apache Lounge (только версия 2.4, с документацией) или Apache Haus (версии 2.4 и 2.2, без документации). Он представляет собой ZIP-архив, который, по замыслу поставщиков дистрибутива, нужно распаковать в корень диска C:.
Поскольку мы всё равно будем проводить оптимизацию размещения файловой структуры Web-сервера, первичную установку нужно выполнить в ту папку, которая предназначена для размещения исполняемых модулей web-сервера (exe-, lib-, so- файлов и прочих, которые не подвержены изменениям). Это может быть системная папка «Program Files» или другая по выбору системного администратора.
После первичной установки нужно вынести из «базовой» папки в другое место на диске папки с файлами, которые «идеологически» относятся не к web-серверу, а к web-сайту. Для определённости будем предполагать, после распаковки дистрибутива все его компоненты находятся в папке «C:\Program Files\Apache24», а web-сайт будет размещаться в папке «D:\www».
Оригинальный httpd.conf
Оригинальный конфигурационный файл httpd.conf, созданный инсталятором Apache, на основе инструкций по инсталяции, приведенных в этой статье, можно скачать тут: httpd.conf.original.
Последнее обновление статьи: 2011/09/08
| Серьезная уязвимость Apache (все версии младше 2.2.20) |
| Установка и настройка PHP, MySQL и Apavhe |
| Конфигурационные директивы Apache файла http.conf |
| Русскоязычный перевод комментариев httpd.conf |
| PHP — как установить и настроить |
| MySQL — как установить и настроить |
Опубликовано: 2011/08/29
HTML-код ссылки на эту страницу:
<a href=»https://petrenco.com/apache.php?txt=84″ target=»_blank»>Apache — установка и настройка.</a>
140163
Удаление службы используя командную строку
На моей практике был случай, когда я удалил файлы веб-сервера, забыв перед этим остановить службу и удалить ее. Соответственно служба не работала, так как файлы были удалены, но висела в списках. При развертывании нового веб-сервера, а именно при попытки установить службу, консоль ругалась, что данная служба уже установлена.
Для решения данной проблемы пришлось удалить службу, выполнив в командной строке следующую команду:
C:\Windows\system32>sc delete ServiceName
или
C:\Windows\system32>sc delete "Service Name"
где ServiceName или «Service Name» имя удаляемой службы
По итогам изучения данного материала мы рассмотрели процесс установки локального веб-сервера, познакомились с главным конфигурационным файлом httpd.conf и его основными директивами. Так же мы рассмотрели механизмы управления службой Apache, такие как: запуск, остановка, удаление, просмотр версии.
На следующем шаге мы подключим модуль интерпретатора языка программирование PHP к установленному веб-серверу, и тем самым укажем веб-серверу, что он должен исполнять php скрипты.
Таблица совместимости версии Apache и ОС Microsoft Windows
|
Apache |
пакет Microsoft Visual C++ |
Операционная система |
|---|---|---|
|
httpd-2.2.x-x86 |
VC9 |
Windows XP, Windows Server 2003, Windows Vista, Windows Server 2008, Windows 7, Windows Server 2012, Windows 8/8.1 |
|
httpd-2.2.x-x64 |
Windows XP x64, Windows Server 2003 x64, Windows Vista x64, Windows Server 2008 x64, Windows 7 x64, Windows Server 2012 x64, Windows 8/8.1 x64 |
|
|
httpd-2.4.x-x86 |
VC9 |
Windows XP, Windows Server 2003, Windows Vista, Windows Server 2008, Windows 7, Windows Server 2012, Windows 8/8.1 |
|
httpd-2.4.x-x64 |
Windows XP x64, Windows Server 2003 x64, Windows Vista x64, Windows Server 2008 x64, Windows 7 x64, Windows Server 2012 x64, Windows 8/8.1 x64 |
|
|
httpd-2.4.x-x86 |
VC11 |
Windows Vista, Windows Server 2008, Windows 7, Windows Server 2012, Windows 8/8.1 |
|
httpd-2.4.x-x86 |
Windows Vista x64, Windows Server 2008 x64, Windows 7 x64, Windows Server 2012 x64, Windows 8/8.1 x64 |
По итогам изучения данного материала мы рассмотрели веб ресурсы, которые предоставляют нам необходимые дистрибутивы. Получив их, приступим к установке и запуску веб-сервера Apache на локальном компьютере.
Apache Flink 1.11.2
Setup from source via Visual Studio C++ (recommended)
Requirements
Thrift’s compiler is written in C++ and designed to be portable, but there are some system requirements. Thrift’s runtime libraries are written in various languages, which are also required for the particular language interface.
- Visual Studio C++, any recent version should do
- Flex and Bison, e.g. the WinFlexBison package
- Apache Thrift Requirements
Build and install the compiler
After all requirements are in place, use the build project to build the Thrift compiler. Copy the resulting EXE file to a location of your choice.
Build and install target libraries
A few of the target language libraries also do provide Visual Studio project files, such as C++ and C#. These are located in the folders.
Most of the language packages must be built and installed manually using build tools better suited to those languages. Typical examples are Java, Ruby, Delphi, or PHP. Look for the file in the folder for more details on how to build and install each language’s library package.
Примеры стихотворений
Сервер 1С:Предприятие на Ubuntu 16.04 и PostgreSQL 9.6, для тех, кто хочет узнать его вкус. Рецепт от Капитана
Если кратко описать мое отношение к Postgres: Использовал до того, как это стало мейнстримом.
Конкретнее: Собирал на нем сервера для компаний среднего размера (до 50 активных пользователей 1С).
На настоящий момент их набирается уже больше, чем пальцев рук пары человек (нормальных, а не фрезеровщиков).
Следуя этой статье вы сможете себе собрать такой же и начать спокойную легальную жизнь, максимально легко сделать первый шаг в мир Linux и Postgres.
А я побороться за 1. Лучший бизнес-кейс (лучший опыт автоматизации предприятия на базе PostgreSQL).
Если, конечно, статья придется вам по вкусу.
17 February 2020 — POI 4.1.2 available
The Apache POI team is pleased to announce the release of 4.1.2.
Featured are a handful of new areas of functionality and numerous bug fixes.
A summary of changes is available in the
Release Notes.
A full list of changes is available in the change log.
People interested should also follow the dev list
to track progress.
The POI source release as well as the pre-built binary deployment packages are listed below.
Pre-built versions of all POI components
are available in the central Maven repository under Group ID «org.apache.poi» and Version
«4.1.2».
Binary Distribution
-
poi-bin-4.1.2-20200217.tar.gz
(28.46 MB, signature (.asc),
checksum: SHA-256,
SHA-512) -
poi-bin-4.1.2-20200217.zip
(39.06 MB, signature (.asc),
checksum: SHA-256,
SHA-512)
Source Distribution
-
poi-src-4.1.2-20200217.tar.gz
(97.42 MB, signature (.asc),
checksum: SHA-256,
SHA-512) -
poi-src-4.1.2-20200217.zip
(101.72 MB, signature (.asc),
checksum: SHA-256,
SHA-512)
Verify
It is essential that you verify the integrity of the downloaded files using the PGP and SHA2 signatures.
Please read
Verifying Apache HTTP Server Releases
for more information on why you should verify our releases. This page provides detailed instructions
which you can use for POI artifacts.
The PGP signatures can be verified using PGP or GPG. First download the
KEYS
file as well as the .asc signature files for the relevant release packages. Make sure you get these
files from the main distribution directory, rather than from a mirror.
Then verify the signatures.
Batch check of all distribution files:
find . -name «*.sha256» -type f -execdir sha256sum -c {} \;
find . -name «*.sha512» -type f -execdir sha512sum -c {} \;
find . -name «*.asc» -exec gpg —no-secmem-warning —verify {} \;
Sample verification of poi-bin-3.5-FINAL-20090928.tar.gz
% gpg —import KEYS
gpg: key 12DAE9BE: «Glen Stampoultzis <glens at apache dot org>» not changed
gpg: key 4CEED75F: «Nick Burch <nick at gagravarr dot org>» not changed
gpg: key 84B5A42E: «Rainer Klute <rainer.klute at gmx dot de>» not changed
gpg: key F5BB52CD: «Yegor Kozlov <yegor.kozlov at gmail dot com>» not changed
gpg: Total number processed: 4
gpg: unchanged: 4
% gpg —verify poi-bin-3.5-FINAL-20090928.tar.gz.asc poi-bin-3.5-FINAL-20090928.tar.gz
gpg: Signature made Mon Sep 28 10:28:25 2009 PDT using DSA key ID F5BB52CD
gpg: Good signature from «Yegor Kozlov <yegor.kozlov at gmail dot com>»
gpg: aka «Yegor Kozlov <yegor at dinom dot ru>»
gpg: aka «Yegor Kozlov <yegor at apache dot org>»
Primary key fingerprint: 7D77 0C77 6CE7 754E E6AF 23AA 6934 0A02 F5BB 52CD
% gpg —fingerprint F5BB52CD
pub 1024D/F5BB52CD 2007-06-18
Key fingerprint = 7D77 0C77 6CE7 754E E6AF 23AA 6934 0A02 F5BB 52CD
uid Yegor Kozlov <yegor.kozlov at gmail dot com>
uid Yegor Kozlov <yegor at dinom dot ru>
uid Yegor Kozlov <yegor at apache dot org>
sub 4096g/7B45A98A 2007-06-18
Running Apache as a Console Application
Running Apache as a service is usually the recommended way to
use it, but it is sometimes easier to work from the command line,
especially during initial configuration and testing.
To run Apache from the command line as a console application,
use the following command:
Apache will execute, and will remain running until it is stopped
by pressing Control-C.
You can also run Apache via the shortcut Start Apache in Console
placed to during the installation.
This will open a console window and start Apache inside it. If you
don’t have Apache installed as a service, the window will remain
visible until you stop Apache by pressing Control-C in the console
window where Apache is running in. The server will exit in a few
seconds. However, if you do have Apache installed as a service, the
shortcut starts the service. If the Apache service is running
already, the shortcut doesn’t do anything.
If Apache is running as a service, you can tell it to stop by opening another console
window and entering:
Running as a service should be preferred over running in a
console window because this lets Apache end any current operations
and clean up gracefully.
But if the server is running in a console window, you can
only stop it by pressing Control-C in the same window.
You can also tell Apache to restart. This forces it to reread
the configuration file. Any operations in progress are allowed to
complete without interruption. To restart Apache, either press
Control-Break in the console window you used for starting Apache,
or enter
if the server is running as a service.
Note for people familiar with the Unix version of Apache:
these commands provide a Windows equivalent to and . The
command line option used, , was chosen as a reminder
of the command used on Unix.
If the Apache console window closes immediately or unexpectedly
after startup, open the Command Prompt from the Start Menu —>
Programs. Change to the folder to which you installed Apache, type
the command , and read the error message. Then
change to the logs folder, and review the
file for configuration mistakes. Assuming httpd was installed into
,
you can do the following:
Then wait for Apache to stop, or press Control-C. Then enter the
following:
When working with Apache it is important to know how it will
find the configuration file. You can specify a configuration file
on the command line in two ways:
-
specifies an absolute or relative path to
a particular configuration file:or
-
specifies the installed Apache service
whose configuration file is to be used:
In both of these cases, the proper
should be set in
the configuration file.
If you don’t specify a configuration file with
or , Apache will use the file name compiled into the
server, such as . This built-in path
is relative to the installation directory. You can verify the compiled
file name from a value labelled as when
invoking Apache with the switch, like this:
Apache will then try to determine its by trying the following, in this order:
- A directive
via the command line switch. - The switch on the command line.
- Current working directory.
- A registry entry which was created if you did a binary
installation. - The server root compiled into the server. This is by default, you can verify it by using and looking for a value labelled as
.
If you did not do a binary install, Apache will in some
scenarios complain about the missing registry key. This warning can
be ignored if the server was otherwise able to find its
configuration file.
Binary Releases
Binary release packages are provided for your convenience and not considered as primary
release artifacts of the ASF. It’s recommended to verify a release downloadable, following
. For more information about Apache release policy see
| Version | Docs | Release Notes | Date | Binary |
|---|---|---|---|---|
| 2.9.0 (latest) |
guide, javadoc |
release notes | 2020-10-21 |
apache-ignite-2.9.0-bin.zip (pgp, |
| 2.8.1 |
guide, javadoc |
release notes | 2020-05-27 |
apache-ignite-2.8.1-bin.zip (pgp, |
| 2.8.0 |
guide, javadoc, scaladoc |
release notes | 2020-03-03 |
apache-ignite-2.8.0-bin.zip (pgp, |
| 2.7.6 |
guide, javadoc, scaladoc |
release notes | 2019-09-19 |
apache-ignite-2.7.6-bin.zip (pgp, |
| 2.7.5 |
guide, javadoc, scaladoc |
release notes | 2019-06-04 |
apache-ignite-2.7.5-bin.zip (pgp, |
| 2.7.0 |
guide, javadoc, scaladoc |
release notes | 2018-12-05 |
apache-ignite-2.7.0-bin.zip (pgp, |
| 2.6.0 |
guide, javadoc, scaladoc |
release notes | 2018-07-16 |
apache-ignite-fabric-2.6.0-bin.zip (pgp, |
| 2.5.0 |
guide, javadoc, scaladoc |
release notes | 2018-05-29 |
apache-ignite-fabric-2.5.0-bin.zip (pgp, |
If you are looking for previous release versions of Apache Ignite, please have a look in the
archive.
Как работает веб-сервер Apache?
Хоть Apache и называется веб-сервер, но в реальном положении вещей он является не сервером, а программой, которая запускается на сервере. Его задача установить соединение между сервером и браузером посетителей (Firefox, Google Chrome, Safari и др.) при доставке файлов туда и обратно между ними (клиент-серверная структура). Apache – это кроссплатформенное программное обеспечение, что значит оно хорошо работает как на Unix, так и на Windows серверах.
Когда посетитель хочет загрузить страницу вашего сайта, например, домашнюю страницу или страницу «О нас», его браузер отправляет запрос на ваш сервер и Apache возвращает ответ со всеми запрошенными файлами (текст, изображение и так далее). Сервер и клиент взаимодействуют по протоколу HTTP и Apache ответственен за гладкое и безопасное соединение между двумя машинами.
Apache хорошо и удобно настраиваемый поскольку имеет модульную структуру. Модули позволяют администраторам сервера включать или выключать дополнительную функциональность. У Apache есть модули безопасности, кэширования, редактирования URL, аутентификации по средством пароля и другие. Вы можете установить свою собственную конфигурацию через файл .htaccess, который является файлом настроек для Apache и поддерживается всеми тарифными планами Hostinger.
Знаете ли вы, что в Hostinger есть специальные предложения? Посетите нашу страницу купонов и сэкономьте до 82%!
Не стоит забывать, что это предложение ограничено во времени!
Использовать Купон
Project News
17 February 2020 — POI 4.1.2 available
The Apache POI team is pleased to announce the release of 4.1.2.
This release features better chart support in XDDF, various rendering fixes in the Common SL/EMF modules
and OOM fixes when handling arbitrary slide indexes in XSLF (+ a new dependency to SparseBitSet 1.2).
Several dependencies were also updated to their latest versions to pick up security fixes and other improvements.
A summary of changes is available in the
Release Notes.
A full list of changes is available in the .
People interested should also follow the dev list to track progress.
See the page for more details.
POI requires Java 8 or newer since version 4.0.1.
Description:
When using the tool XSSFExportToXml to convert user-provided Microsoft
Excel documents, a specially crafted document can allow an attacker to
read files from the local filesystem or from internal network resources
via XML External Entity (XXE) Processing.
Mitigation:
Apache POI 4.1.0 and before: users who do not use the tool XSSFExportToXml
are not affected. affected users are advised to update to Apache POI 4.1.1
which fixes this vulnerability.
Credit:
This issue was discovered by Artem Smotrakov from SAP
References:
XML external entity attack
26 March 2019 — XMLBeans 3.1.0 available
The Apache POI team is pleased to announce the release of XMLBeans 3.1.0.
Featured are a handful of bug fixes.
The Apache POI project has unretired the XMLBeans codebase and is maintaining it as a sub-project,
due to its importance in the poi-ooxml codebase.
A summary of changes is available in the
Release Notes.
People interested should also follow the POI dev list to track progress.
The XMLBeans JIRA project has been reopened and feel free to open issues.
POI 4.1.0 uses XMLBeans 3.1.0.
XMLBeans requires Java 6 or newer since version 3.0.2.
Копирование числовых ячеек из 1С в Excel Промо
Решение проблемы, когда значения скопированных ячеек из табличных документов 1С в Excel воспринимаются последним как текст, т.е. без дополнительного форматирования значений невозможно применить арифметические операции. Поводом для публикации послужило понимание того, что целое предприятие с более сотней активных пользователей уже на протяжении года мучилось с такой, казалось бы на первый взгляд, тривиальной проблемой. Варианты решения, предложенные специалистами helpdesk, обслуживающими данное предприятие, а так же многочисленные обсуждения на форумах, только подтвердили убеждение в необходимости описания способа, который позволил мне качественно и быстро справиться с ситуацией.
Download Apache Tika
Apache Tika 1.25 is now available. See the CHANGES.txt file for more information on the list of updates in this initial release.
- Mirrors for tika-1.25-src.zip (source archive, PGP signature, SHA512)
- Mirrors for tika-app-1.25.jar (runnable jar, PGP signature, SHA512)
- Mirrors for tika-server-1.25.jar (runnable jar, PGP signature, SHA512)
- Mirrors for tika-server-1.25.bin.zip (tika-server as a service), PGP signature, SHA512)
- Mirrors for tika-eval-1.25.jar (runnable jar, PGP signature, SHA512)
Apache Tika releases are available under the Apache License, Version 2.0. See the NOTICE.txt file contained in each release artifact for applicable copyright attribution notices.
If you are looking for previous releases of Apache Tika, have a look in the archives.
Рейтинг лучших электрошашлычниц 2020-2019
Running Apache as a Service
Apache comes with a utility called the Apache Service Monitor.
With it you can see and manage the state of all installed Apache
services on any machine on your network. To be able to manage an
Apache service with the monitor, you have to first install the
service (either automatically via the installation or manually).
You can install Apache as a Windows NT service as follows from
the command prompt at the Apache subdirectory:
If you need to specify the name of the service you want to
install, use the following command. You have to do this if you
have several different service installations of Apache on your
computer. If you specify a name during the install, you have to
also specify it during any other -k operation.
If you need to have specifically named configuration files for
different services, you must use this:
If you use the first command without any special parameters except
, the service will be called
and the configuration will be assumed to be .
Removing an Apache service is easy. Just use:
The specific Apache service to be uninstalled can be specified by using:
Normal starting, restarting and shutting down of an Apache
service is usually done via the Apache Service Monitor, by using
commands like and or via normal Windows service management. Before
starting Apache as a service by any means, you should test the
service’s configuration file by using:
You can control an Apache service by its command line switches,
too. To start an installed Apache service you’ll use this:
To stop an Apache service via the command line switches, use
this:
or
You can also restart a running service and force it to reread
its configuration file by using:
By default, all Apache services are registered to run as the
system user (the account). The
account has no privileges to your network
via any Windows-secured mechanism, including the file system, named
pipes, DCOM, or secure RPC. It has, however, wide privileges locally.
Never grant any network privileges to
the account! If you need Apache to be able
to access network resources, create a separate account for Apache as
noted below.
It is recommended that users create a separate account for running
Apache service(s). If you have to access network resources via Apache,
this is required.
- Create a normal domain user account, and be sure to
memorize its password. - Grant the newly-created user a privilege of and . On Windows NT 4.0 these privileges are granted via
User Manager for Domains, but on Windows 2000 and XP you probably
want to use Group Policy for propagating these settings. You can
also manually set these via the Local Security Policy MMC snap-in. - Confirm that the created account is a member of the Users
group. - Grant the account read and execute (RX) rights to all document
and script folders ( and
for example). - Grant the account change (RWXD) rights to the
Apache directory. - Grant the account read and execute (RX) rights to the
binary executable.
It is usually a good practice to grant the user the Apache
service runs as read and execute (RX) access to the whole Apache2.4
directory, except the subdirectory, where the
user has to have at least change (RWXD) rights.
If you allow the account to log in as a user and as a service,
then you can log on with that account and test that the account has
the privileges to execute the scripts, read the web pages, and that
you can start Apache in a console window. If this works, and you
have followed the steps above, Apache should execute as a service
with no problems.
Error code 2186 is a good indication that
you need to review the «Log On As» configuration for the service,
since Apache cannot access a required network resource. Also, pay
close attention to the privileges of the user Apache is
configured to run as.
When starting Apache as a service you may encounter an error
message from the Windows Service Control Manager. For example,
if you try to start Apache by using the Services applet in the
Windows Control Panel, you may get the following message:
You will get this generic error if there is any problem with
starting the Apache service. In order to see what is really causing
the problem you should follow the instructions for Running Apache
for Windows from the Command Prompt.
Запуск сервера и проверка настройки
Поскольку мы изменили файловую структуру Web-сервера, запускать исполняемый модуль сервера нужно командой (её можно записать в bat- или cmd-файл):
Запущенный в режиме пользовательского приложения Apache (т. е. запущенный с помощью только что приведенной командной строки) может быть остановлен комбинацией клавиш +. Если же при этом возникли какие-нибудь трудности, то можно использовать такую команду:
Чтобы установить Apache в качестве службы, надо выполнить команду:
Запуск и останов службы Web-сервера Apache производится командами: и соответственно.
Удалить Apache из списка служб Windows можно с помощью команды:
Проверка правильности установки и первоначальной настройки Web-сервера выполняется вводом в Web-браузере URL: «http://localhost:80/». Если всё было выполнено правильно, должна открыться страничка с текстом «It works!»
Apache ведёт протокол доступа к сайту в файле «D:\www\conf\access.log». Сведения о проблемах в работе сервера записываются в файл «D:\www\conf\error.log». Его анализ может быть особенно полезен при настройке выполнения CGI-сценариев.
Современный телевизор не включается, а индикатор горит: что делать
Если телевизор не включается, лучше всего обратиться в сервисный центр. Но, если сегодня выходной день, или неприятность приключилась вечером, то можно попытаться устранить проблему самостоятельно. Прежде всего нужно провести предварительный осмотр техники.
Прежде, чем искать решение для устранения проблемы, необходимо точно определить, вид имеющегося у вас прибора: ЖК это, плазменный телевизор, или кинескопный. В настоящее время выпускают и жидкокристаллические, и кинескопные, и плазменные устройства. В случае если один из них сломался, особых отличий в ремонте не будет, потому, что разница заключается лишь в «дизайне», а внутреннее устройство прибора остается одинаковым.
В случае, если телевизор не включается, лучше всего обратиться за помощью в сервисный центр
Телевизоры почти всегда имеют различные неполадки, но все они на первый взгляд имеют примерно одинаковые признаки:
- Индикатор постоянно мигает красным и зеленым цветом;
- Прибор щелкает, гудит, трещит или свистит;
- Лампочка индикатора вовсе не работает;
- Не включается телевизор, однако на индикаторе горит синий цвет.
Одинаково характеризовать сломавшийся прибор будет, также, сразу отсутствие реакции на нажатие кнопок пульта, и полное отключение в то время, когда блок питания включен. Если плазма сразу не запускается, повторите попытку.
Возможные проблемы
Одна из самых частых проблем заключается в том, что система не распознает устройство. В таком случае необходимо установить драйвер и ПО, которые содержатся на прилагаемом к рулю компакт диске. Если так случилось, что диска в комплекте нет, либо вы его потеряли (и такое бывает), можно скачать драйвера на сайте производителя. Обычно, после этого устройство должно сразу же определиться системой, однако вы можете сделать это и вручную, открыв «Пуск» — «Устройства и принтеры», если речь идет о Windows 7.
Откроется список всех доступных устройств, если руля там не оказалось, тогда необходимо нажать кнопку «Добавление устройства» и следовать дальнейшим указаниям на экране.
Процедура калибровки
Теперь перейдем к «калибровке», помните я говорил про то, что положения руля в игре и в реальности могут не совпадать? Так вот, чтобы устранить это неприятное явление необходимо пройти процедуру калибровки. Запустить ее можно как из специального приложения (доп ПО в комплекте), типа «Logitech Profiler», так и из самой системы. Откалибровать можно также и педали (силу нажатия, линейность хода), если они есть.
Для начала нажмите комбинацию клавиш «Win+R» и в строке поиска впишите «joy.cpl» (без кавычек), в открывшемся окне выберите руль и кликните «Свойства». Конкретно для руля «Logitech Driving Force GT» необходимо нажать на верхние боковые клавиши поочередно для успешной калибровки. Тут же, можно задать и максимальный угол поворота, нажав на кнопку «Settings».
Чуть не забыл, для правильно работы этого устройства в самих играх предусмотрен отдельный раздел настроек, в котором можно выставить различные параметры по своему «вкусу». Часть из этих настроек пересекается с теми, что можно отрегулировать через «joy.cpl», например «сила обратной связи». Сейчас не буду углубляться в то, что значит каждый из этих многочисленных параметров, это тема отдельной статьи, просто помните — что в большинстве случаев руль необходимо настраивать еще и в самой игре.
- https://lumpics.ru/how-to-connect-the-wheel-with-pedals-to-the-computer/
- https://pc-consultant.ru/videoigry/kak-podkljuchit-rul-k-kompjuteru/
- http://pc-information-guide.ru/periferiya/kak-podklyuchit-rul-k-kompyuteru.html
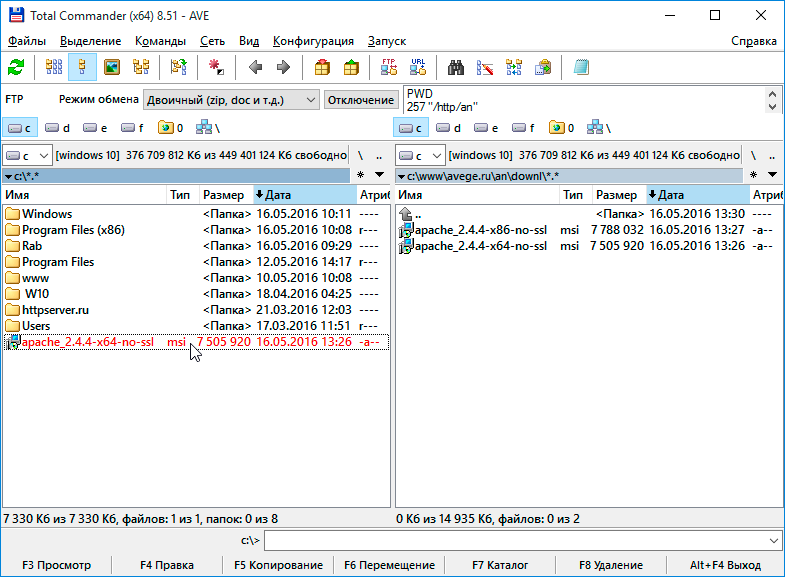
Распаковка архива Apache
Открываем скаченный с веб-сервером архив и распаковываем (копируем) директорию «Apache24» в корень локального диска C:
Для базовой настройки веб-сервера Apache перейдем в директорию «C:\Apache24\conf\» и найдем файл «httpd.conf». Откроем данный файл в текстовом редакторе, просмотрим его и по необходимости внесем изменения. Большая часть файла состоит из комментарий и пояснений, начинающихся со знака # (решетка). В качестве текстового редактора могу посоветовать Notepad++.
Конфигурационный файл httpd.conf
httpd.conf — главный файл конфигурации веб-сервера Apache, содержащий директивы, управляющие работой веб-сервера.
Notepad++ — свободный текстовый процессор (текстовый редактор) с открытым исходным кодом для Windows с подсветкой синтаксиса большого количества языков программирования и разметки.
Изменим значения основных директив конфигурационного файла httpd.conf
ServerRoot "С:/Apache24"
каталог, в котором расположен веб-сервер
Listen 80
номер порта для веб-сервера
LoadModule rewrite_module modules/mod_rewrite.so
Для загрузки модуля mod_rewrite раскомментируем строку
AddDefaultCharset utf-8
значение кодировки по умолчанию
ServerAdmin admin@example.com
ServerName localhost:80
определяет имя и порт, который используется сервером для идентификации себя.
DocumentRoot "C:/Apache24/htdocs"
Назначаем корневую директорию управления сайтами
ErrorLog "logs/error.log"
расположение файла журнала ошибок.
LogLevel warn
уровень ошибок
CustomLog "logs/access.log" common
Установка сервиса (службы) Apache
Далее необходимо установить сервис Apache как службу. Для этого нам понадобится командная строка. Командная строка должна быть запущена от имени администратора.
Командная строка — позволяет вводить и выполнять команды операционной системы MS-DOS и другие компьютерные команды. Вводя команды, вы можете выполнять на компьютере различные задачи, не пользуясь мышью или сенсорным вводом.
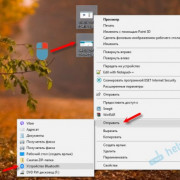
Для того чтобы запустить командную строку необходимо нажать на кнопку «Пуск». В поле поиска введите «cmd» или «Командная строка», затем в списке результатов поиска наведите мышкой на найденный пункт («cmd» или «Командная строка»), щелкните по нему правой кнопкой мыши и выберите пункт «Запуск от имени администратора».
Перед нами появится окно консоли.
C:\Windows\system32>
Теперь необходимо перейти в директорию веб-сервера «bin» где находится файл «httpd.exe». Для этого используем команду «cd» и указываем полный путь до директории где находится файл «httpd.exe».
C:\Windows\system32>cd C:\Apache24\bin
C:\Apache24\bin>
Для того, что бы установить сервис Apache как службу, необходимо выполнить команду
C:\Apache24\bin>httpd.exe -k install
При удачном выполнение установки получаем примерно такой ответ:
Installing the Apache2.4 service
The Apache2.4 service is successfully installed.
Testing httpd.conf....
Errors reported here must be corrected before the service can be started.
Перевод:
Установка службы Apache2.4
Служба Apache2.4 успешно установлен.
Тестирование httpd.conf ….
Ошибки, описанные здесь, должны быть исправлены и услуга может быть запущена.
Строка «The Apache2.4 service is successfully installed» означает, что служба установлена.
Если после строки «Errors reported here must be corrected before the service can be started» нет никаких сообщений, это означает, что в конфигурационных файлах не найдено критических ошибок и служба Apache24 запущена. Проверить ее работу можно открыв в браузере страницу localhost или страницу 127.0.0.1. Если страница по данным адресам открывается, то Вы добились желаемого, веб-сервер Apache установлен.
В случае, если после строки «Errors reported here must be …» присутствуют сообщения, то необходимо их исправить и перезапустить службу Apache. Обращаю Ваше на фразу «перезапустить», а не установить, ведь служба Apache24 уже установлена, просто она не может быть запущена, так как имеет ошибки в конфигурации.
PGP Signatures
All of the release distribution packages have been digitally signed
(using PGP or GPG) by the Apache Group members that constructed them.
There will be an accompanying distribution.asc file
in the same directory as the distribution. The PGP keys can be found
at the MIT key repository and within this project’s
KEYS file.
Always use the signature files to verify the authenticity
of the distribution, e.g.,
% pgpk -a KEYS
% pgpv httpd-2.2.8.tar.gz.asc
or,
% pgp -ka KEYS
% pgp httpd-2.2.8.tar.gz.asc
or,
% gpg --import KEYS
% gpg --verify httpd-2.2.8.tar.gz.asc
We offer MD5 hashes as an alternative to validate the integrity
of the downloaded files. A unix program called or
is included in many unix distributions. It is
also available as part of GNU
Textutils. Windows users can get binary md5 programs from here, here, or
here.
Сборка Apache + PHP + MySQL + phpMyAdmin
Если вы хотите в несколько кликов получить работающий веб-сервер Apache + PHP + MySQL + phpMyAdmin на Windows, то скачайте готовую сборку, которая включает полностью настроенный для Windows веб-сервер, который достаточно распаковать и запустить кликом по ярлыку.
Apache 2.4 один из самых быстрых, эффективных и наиболее функциональных веб-серверов
До версии HTTPD-2.2.25 (), можно было получить текущую версию инсталлятора Apache для Windiws на сайте Apache HTTP Server (HTTPD-2.2.25-win32-x86-OpenSSL-0.9.8y.msi). В настоящее время вы не сможете загрузить инсталляторы Apache со страницы загрузки — Apache Download binaries win32. Их нужно искать на сайтах сторонних производителей.
Для установки сервера на домашний компьютер, используйте версию no-ssl.
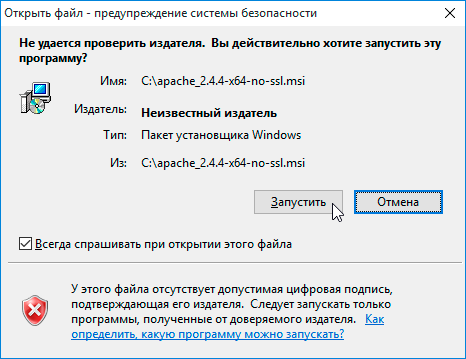
Для установки Apache из установочного пакета запустите ( обязательно из корневого каталога диска ) программу инсталляции сервера Apache, соответствующую установленной версии ОС. Пример для 64-разрядной версии Windows.
Процедура инсталляции в ОС Windows полностью автоматизирована. Запустите программу инсталляции — apache_2.4 -x64-no-ssl.msi.
Просмотрите — Открыть файл — предупреждение системы безопасности и нажмите — Запустить
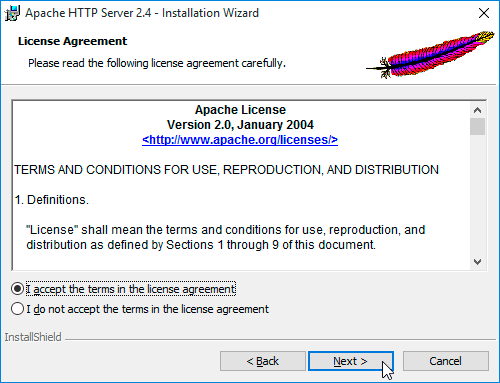
В окне Apache HTTP Server 2.4 — Installation-Wizard (Мастера Инсталляции) нажмите кнопку Next.

Прочитайте лицензию и поставьте точку в пункт — I accept the terms in license agreement (Я принимаю условия лицензионного соглашения).
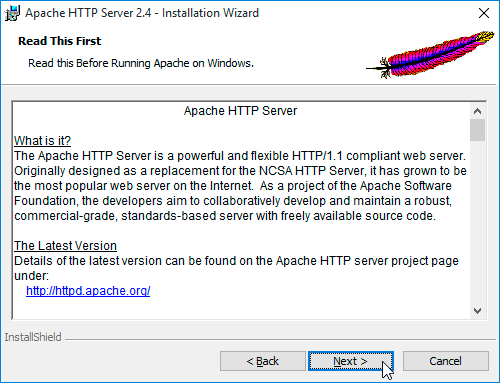
Ознакомьтесь с кратким описанием Apache HTTP Server и нажмите кнопку — Next
С первых версий инсталляторы apache предлагают вводить в поля: Сетевой Домен, Имя сервера, например — somenet.com (некоторая сеть). Но это имя зарегистрировано и уже 15 лет его пытаются продать.

Можно использовать доменные имена — example.com (.net, .org, .edu), а также test.ru — зарезервированные для использования в документации, различных примерах. недоступные для регистрации и использования в сети интернет.
Чтобы в локальных сетях, на домашнем компьютере, не обращаться к главному сайту сервера Apache по имени — www.example.com (www.пример.com) — можно изменить его на любое другое. Например — server-apache24.ru server-apache24.ru — будет именем главного сайта сервера Apache.
В окне диалога Server Information — заполните поля ввода следующим образом:
- в Network Domain (Сетевой Домен) введите — server-apache24.ru
- в Server Name (Имя сервера) введите — www.server-apache24.ru
- в Administrator’s Email Adress (Почтовый Адрес Администратора) введите — admin@server-apache24.ru

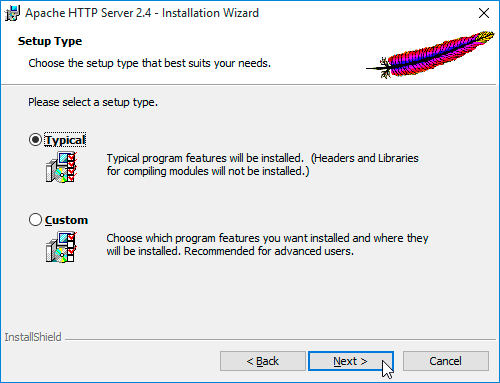
Выберите тип установки — Tupical (обычная, типичная)
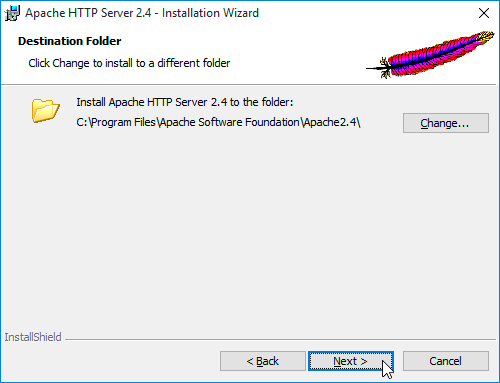
Согласитесь с установкой в каталог, предложенный по умолчанию. C:Program FilesApache Software FoundationApache2.4
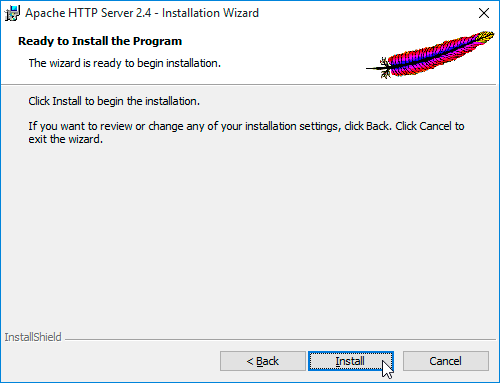
Для проведения инсталляции сервера Apache — apache_2.4. -x64, нажмите кнопку — Install
Во время установки будут, несколько раз, мелькать черные окна DOS

В конце установки вы увидите сообщение:
Администратор: Командная строка
Для завершения установки Apache HTTP Server 2.4 — нажмите на кнопку Finish и перезагрузите компьютер.